IPv6 路由实验
注:如无特别说明,描述中的 R1 或 SW1 对应拓扑中设备名称末尾数字为 1 的设备,R2 或 SW2 对应拓扑中设备名称末尾数字为 2 的设备,以此类推;另外,同一网段中,IP 地址的主机位为其设备编号,如 R3 的 g0/0 接口若在
192.168.1.0/24网段,则其 IP 地址为192.168.1.3/24,以此类推
实验需求
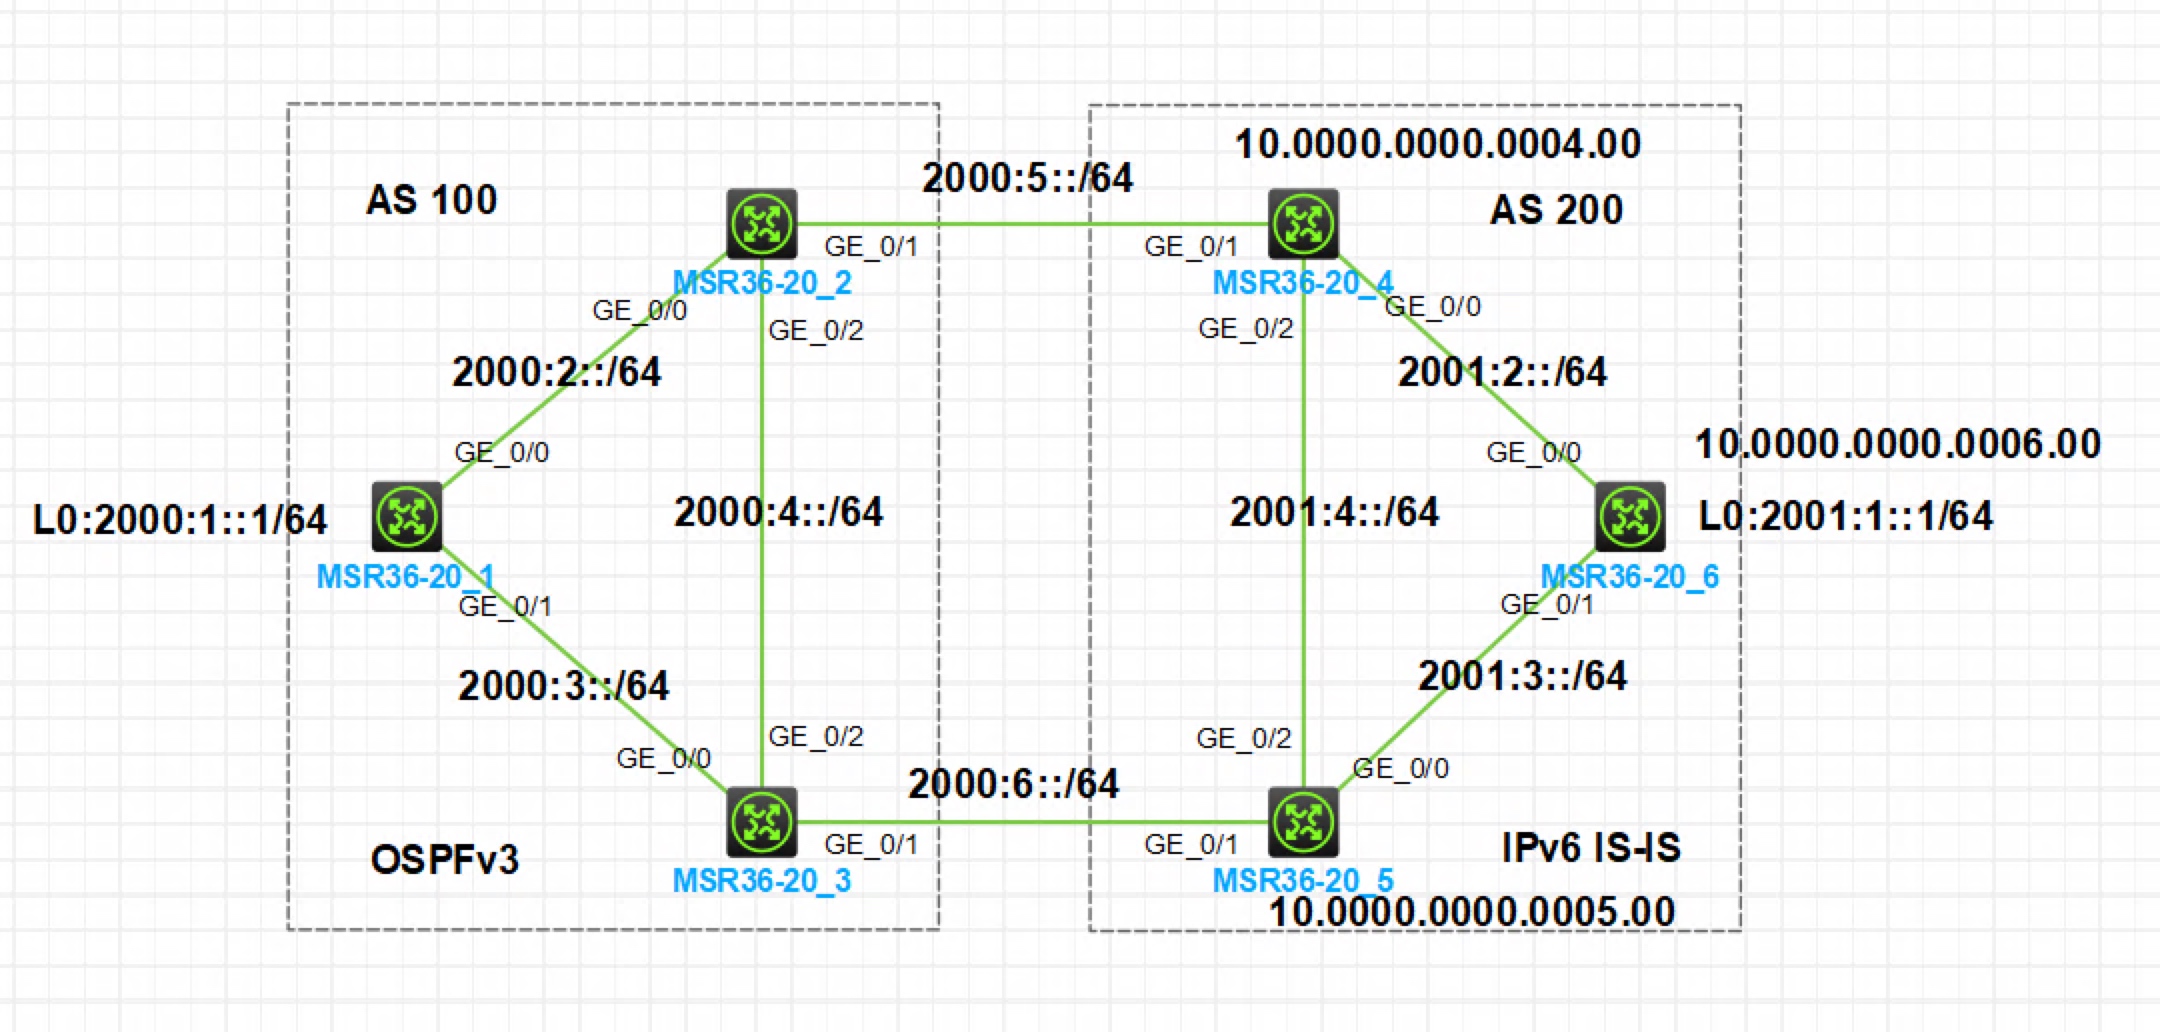
- 按照图示配置 IPv6 地址,R1 和 R6 使用 Loopback0 口模拟业务地址
- 按照图示配置单区域 OSPFv3 和单区域 IPv6 IS-IS 使 AS100 和 AS 200 内部分别互通
- 配置 BGP4+,R1 和 R2/R3 建立 IBGP 邻居;R6 和 R4/R5 建立 IBGP 邻居;R2 和 R4,R3 和 R5 分别建立 EBGP 邻居
- 在 R1 和 R6 上分别以 Network 方式把各自业务路由宣告进 BGP,使 R1 和 R6 的业务地址能够通过 BGP 路由实现互通
实验解法
配置 IPv6 地址部分略
配置 OSPFv3
步骤 1:在 R1 上创建 OSPFv3 进程,并把连接 R2 和 R3 的接口,以及业务口使能在区域 0
[R1]ospfv3 1
[R1-ospfv3-1]router-id 1.1.1.1
[R1]interface g0/0
[R1-GigabitEthernet0/0]ospfv3 1 area 0
[R1]interface g0/1
[R1-GigabitEthernet0/1]ospfv3 1 area 0
[R1]interface LoopBack 0
[R1-LoopBack0]ospfv3 1 area 0
步骤 2:在 R2 上创建 OSPFv3 进程,并把连接 R1 和 R3 的接口使能在区域 0
[R2]ospfv3 1
[R2-ospfv3-1]router-id 2.2.2.2
[R2]interface g0/0
[R2-GigabitEthernet0/0]ospfv3 1 area 0
[R2]interface g0/2
[R2-GigabitEthernet0/2]ospfv3 1 area 0
步骤 3:在 R3 上创建 OSPFv3 进程,并把连接 R1 和 R2 的接口使能在区域 0
[R3]ospfv3 1
[R3-ospfv3-1]router-id 3.3.3.3
[R3]interface g0/0
[R3-GigabitEthernet0/0]ospfv3 1 area 0
[R3]interface g0/2
[R3-GigabitEthernet0/2]ospfv3 1 area 0
配置 IPv6 IS-IS
步骤 1:在 R4 上创建 IS-IS 进程,设置 IS-Level 为 Level-1,配置 NET 地址,并把连接 R4 和 R5 的接口使能 IPv6 IS-IS
[R4]isis
[R4-isis-1]is-level level-1
[R4-isis-1]network-entity 10.0000.0000.0004.00
[R4-isis-1]address-family ipv6 unicast
[R4]interface g0/0
[R4-GigabitEthernet0/0]isis ipv6 enable
[R4]interface g0/2
[R4-GigabitEthernet0/2]isis ipv6 enable
步骤 2:在 R5 上创建 IS-IS 进程,设置 IS-Level 为 Level-1,配置 NET 地址,并把连接 R4 和 R6 的接口使能 IPv6 IS-IS
[R5]isis
[R5-isis-1]is-level level-1
[R5-isis-1]network-entity 10.0000.0000.0005.00
[R5-isis-1]address-family ipv6 unicast
[R5]interface g0/0
[R5-GigabitEthernet0/0]isis ipv6 enable
[R5]interface g0/2
[R5-GigabitEthernet0/2]isis ipv6 enable
步骤 3:在 R6 上创建 IS-IS 进程,设置 IS-Level 为 Level-1,配置 NET 地址,并把连接 R3 和 R4 的接口,以及业务口使能 IPv6 IS-IS
[R6]isis
[R6-isis-1]is-level level-1
[R6-isis-1]network-entity 10.0000.0000.0006.00
[R6-isis-1]address-family ipv6 unicast
[R6]interface g0/0
[R6-GigabitEthernet0/0]isis ipv6 enable
[R6]interface g0/1
[R6-GigabitEthernet0/2]isis ipv6 enable
[R6]interface LoopBack 0
[R6-LoopBack0]isis ipv6 enable
配置 BGP4+,R1 和 R2/R3 建立 IBGP 邻居;R6 和 R4/R5 建立 IBGP 邻居;R2 和 R4,R3 和 R5 分别建立 EBGP 邻居
步骤 1:在 R1 上创建 BGP 进程,并与 R2 和 R3 建立 IBGP 邻居,使能在 IPv6 单播地址族
[R1]bgp 100
[R1-bgp-default]router-id 1.1.1.1     //一定需要配置 Router-id
[R1-bgp-default]peer 2000:2::2 as-number 100    //与 IPv4 BGP 一致,实际场景中,建议使用 Loopback 口建立 IBGP 邻居,这里只演示使用物理接口地址建立
[R1-bgp-default]peer 2000:3::3 as-number 100
[R1-bgp-default]address-family ipv6 unicast
[R1-bgp-default-ipv6]peer 2000:2::2 enable
[R1-bgp-default-ipv6]peer 2000:3::3 enable
步骤 2:在 R2 上创建 BGP 进程,并与 R1 建立 IBGP 邻居, 与 R4 建立 EBGP 邻居,使能在 IPv6 单播地址族。并配置发往 R1 的路由下一跳变更为本机
[R2]bgp 100
[R2-bgp-default]router-id 2.2.2.2
[R2-bgp-default]peer 2000:2::1 as-number 100
[R2-bgp-default]peer 2000:5::4 as-number 200
[R2-bgp-default]address-family ipv6 unicast
[R2-bgp-default-ipv6]peer 2000:2::1 enable
[R2-bgp-default-ipv6]peer 2000:5::4 enable
[R2-bgp-default-ipv6]peer 2000:2::1 next-hop-local
步骤 3:在 R3 上创建 BGP 进程,并与 R1 建立 IBGP 邻居, 与 R5 建立 EBGP 邻居,使能在 IPv6 单播地址族。并配置发往 R1 的路由下一跳变更为本机
[R3]bgp 100
[R3-bgp-default]router-id 3.3.3.3
[R3-bgp-default]peer 2000:3::1 as-number 100
[R3-bgp-default]peer 2000:6::5 as-number 200
[R3-bgp-default]address-family ipv6 unicast
[R3-bgp-default-ipv6]peer 2000:3::1 enable
[R3-bgp-default-ipv6]peer 2000:6::5 enable
[R3-bgp-default-ipv6]peer 2000:3::1 next-hop-local
步骤 4:在 R4 上创建 BGP 进程,并与 R6 建立 IBGP 邻居, 与 R2 建立 EBGP 邻居,使能在 IPv6 单播地址族。并配置发往 R6 的路由下一跳变更为本机
[R4]bgp 200
[R4-bgp-default]router-id 4.4.4.4
[R4-bgp-default]peer 2000:5::2 as-number 100
[R4-bgp-default]peer 2001:2::6 as-number 200
[R4-bgp-default]address-family ipv6 unicast
[R4-bgp-default-ipv6]peer 2000:5::2 enable
[R4-bgp-default-ipv6]peer 2001:2::6 enable
[R4-bgp-default-ipv6]peer 2001:2::6 next-hop-local
步骤 5:在 R5 上创建 BGP 进程,并与 R6 建立 IBGP 邻居, 与 R3 建立 EBGP 邻居,使能在 IPv6 单播地址族。并配置发往 R6 的路由下一跳变更为本机
[R5]bgp 200
[R5-bgp-default]router-id 5.5.5.5
[R5-bgp-default]peer 2000:6::3 as-number 100
[R5-bgp-default]peer 2001:3::6 as-number 200
[R5-bgp-default]address-family ipv6 unicast
[R5-bgp-default-ipv6]peer 2000:6::3 enable
[R5-bgp-default-ipv6]peer 2001:3::6 enable
[R5-bgp-default-ipv6]peer 2001:3::6 next-hop-local
步骤 6:在 R6 上创建 BGP 进程,并与 R4 和 R5 建立 IBGP 邻居,使能在 IPv6 单播地址族
[R6]bgp 200
[R6-bgp-default]router-id 6.6.6.6
[R6-bgp-default]peer 2001:2::4 as-number 100
[R6-bgp-default]peer 2001:3::5 as-number 100
[R6-bgp-default]address-family ipv6 unicast
[R6-bgp-default-ipv6]peer 2001:2::4 enable
[R6-bgp-default-ipv6]peer 2001:3::5 enable
在 R1 和 R6 上分别以 Network 方式把各自业务路由宣告进 BGP,使 R1 和 R6 的业务地址能够通过 BGP 路由实现互通
[R1-bgp-default-ipv6]network 2000:1:: 64[R6-bgp-default-ipv6]network 2001:1:: 64效果测试:在 R1 上查看 IPv6 路由表,可以发现学习到的 OSPFv3 和 BGP4+ 路由,在 R6 上查看 IPv6 路由表,发现可以学习到的 IPv6 IS-IS 和 BGP4+ 路由
[R1]display ipv6 routing-table
……
Destination: 2000:4::/64                                 Protocol  : O_INTRA
NextHop    : FE80::C99:C6FF:FEBB:205                     Preference: 10
Interface  : GE0/0                                       Cost      : 2

Destination: 2000:4::/64                                 Protocol  : O_INTRA
NextHop    : FE80::C99:C7FF:FEFD:305                     Preference: 10
Interface  : GE0/1                                       Cost      : 2

Destination: 2001:1::/64                                 Protocol  : BGP4+
NextHop    : 2000:2::2                                   Preference: 255
Interface  : GE0/0                                       Cost      : 0
……
[R6]display ipv6 routing-table …… Destination: 2000:1::/64 Protocol : BGP4+ NextHop : 2001:2::4 Preference: 255 Interface : GE0/0 Cost : 0 Destination: 2001:4::/64 Protocol : IS_L1 NextHop : FE80::C99:C9FF:FE55:405 Preference: 15 Interface : GE0/0 Cost : 20 Destination: 2001:4::/64 Protocol : IS_L1 NextHop : FE80::C99:CAFF:FE80:505 Preference: 15 Interface : GE0/1 Cost : 20 ……